
Right, so I’ve been doing this for about twenty years now and I’m still learning stuff. Had another one of those “well, that’s interesting” moments last month when a support system I thought was bulletproof started showing stress cracks.
I’m Paul, by the way. I do mostly commercial heating and some industrial work around the northwest, bit of agricultural stuff when it’s quiet. This isn’t going to be one of those perfectly organised articles – I’m just going to tell you what I’ve picked up along the way, including the mistakes. Because trust me, there’ve been plenty.
The Time Everything Went Wrong (And Why I Started Actually Paying Attention)
So this was probably 2009, maybe 2010? Job down in Stockport, brewery extension. Nice straightforward run of heating pipework along the outside wall. We’d done dozens like it. Used the same cast iron brackets we always used, same spacing, everything looked spot on.
Sunday morning, half five, phone goes. Site manager, not happy. “Your pipes have exploded,” he says. Well, not literally exploded, but close enough. Overnight frost had taken it down to about minus eight, then the heating fired up and took it straight to fifteen degrees in a couple of hours. Every single bracket had stress fractures. One joint had blown completely – looked like a bomb had gone off.
Insurance covered it, but that was my wake-up call. Started actually reading the spec sheets, talking to suppliers properly instead of just ordering “the usual.” Turns out supports aren’t just things you bolt on at the end – they’re actually doing quite a lot of work.
Materials – The Stuff That Actually Lasts
Malleable Iron
This is my go-to now. Not because it’s cheap (it definitely isn’t), but because it works. They do something in the manufacturing – heat it up to some ridiculous temperature, 900 degrees or something? Don’t ask me for the exact science, but it changes the structure so it can bend a bit rather than just snapping like a biscuit.
Had another Yorkshire job where we’d gone for bog-standard cast iron first time round to save the client a few quid. Six months later – cracks everywhere after the first proper winter. Swapped them all out for malleable iron and they’re still going. That was… 2018? So they’ve been through a few winters now.
Thing is, malleable iron actually meets proper British standards (BS EN 10242 if you’re interested), which means someone’s actually tested it with our weather. And let’s face it, British weather isn’t exactly gentle.
Actually, quick story about that. Was chatting to a mate who does a lot of offshore work, and he reckons our onshore conditions are often harder on equipment than what they get on the rigs. Something about the constant wet-dry cycling we get. Makes sense when you think about it.
The Galvanised vs Malleable Thing (I Used to Get This Completely Wrong)
Right, this embarrassed me for years. I thought galvanised and malleable iron were basically the same thing. Had this conversation with a structural engineer on a job in Preston, and he just looked at me like I’d said something daft. Which I had.
Galvanised iron is just normal iron with a zinc coating. The zinc rusts instead of the iron, which is clever, but the actual iron underneath is still as brittle as it ever was. So if something whacks it or it gets stressed badly, it can still crack.
Malleable iron is different. They actually change the iron during manufacturing – something about the heat treatment changing the internal structure. Makes it less likely to fail when things get rough.
Now I use galvanised when I’m mostly worried about rust – coastal jobs, anywhere with a lot of pollution. But if it’s going to get knocked about or has to deal with thermal expansion, malleable iron’s usually worth the extra cost. Usually. Sometimes the budget just won’t stretch, and you have to make do.
Galvanised Steel – When Things Get Proper Heavy
Now, if you’re talking about really big pipes or serious pressure, galvanised steel’s what you want. More expensive, obviously, but when you absolutely can’t have a failure, it’s the one to go for. Did a chemical plant job couple of years back where they needed supports rated for 60kN. No point messing about – went straight for galvanised steel fabrications.
Mind you, that job was a bit of a nightmare for other reasons. Client kept changing their mind about pipe routes, then wondered why the costs kept going up. But that’s clients for you.
Different Types of Supports (What I Actually Use)
Look, I could give you a massive table with all the technical specs, but honestly, that’s not how I think about it. Here’s what I actually reach for when I’m planning a job:
Fixed Supports These don’t move at all, which is exactly what you want sometimes. I stick them near equipment connections and wherever the pipe changes direction. Key thing is not going mad with them – too many fixed points and your pipe can’t expand properly, then you get stress problems.
Had a job in Bolton where the original installer had put fixed supports every two metres along a 20-metre run. Looked very neat and tidy, but when summer came and the pipe tried to expand… well, let’s just say the expansion joint at the end couldn’t cope with all that stress.
Sliding Supports These are brilliant for long runs. Pipe can slide lengthwise but stays supported vertically. Quality really matters here though – cheap ones seize up after a winter or two, especially anywhere near the coast. Salt air gets into everything.
Spring Hangers Avoided these for years because they looked overly complicated. “Why not just use a rigid hanger?” I thought. Then I did a vertical run on a hospital job and the consultant insisted on spring hangers. Have to admit, they work really well. The variable ones adjust automatically as the pipe moves, constant support ones keep the load steady. Both have their place, though I still think some consultants specify them just to show off.
Adjustable Stands Absolute lifesaver when you’re working on uneven ground. Or when you know the client’s going to want changes later (they always do). The telescopic ones are brilliant – adjust from about 150mm to 2 metres plus. Cost a bit more but save hours of mucking about with packing pieces.
Spacing – The Rules That Actually Work
Everyone wants a simple answer to “how far apart should supports be?” Here’s what works for me:
Small pipes (25-50mm) – every 3-4 metres, max Medium stuff (65-100mm) – 4-5 metres
Bigger pipes (125-200mm) – 5-6 metres Really big stuff (250mm+) – 6-7 metres, but check the calcs
That’s indoors though. Outside, I usually knock about 25% off those distances. Wind loading, thermal stress, general nastiness of outdoor conditions.
And here’s the really important bit – always put a support within a metre of anything that changes. Valves, bends, equipment connections, heavy fittings. Doesn’t matter if it messes up your neat spacing. Just do it.
Learned that one in Glasgow. Had a beautiful evenly-spaced support layout, looked very professional. Except there was a big isolation valve right in the middle of a 5-metre span. Guess where the stress fracture appeared? Yep, right next to the valve.
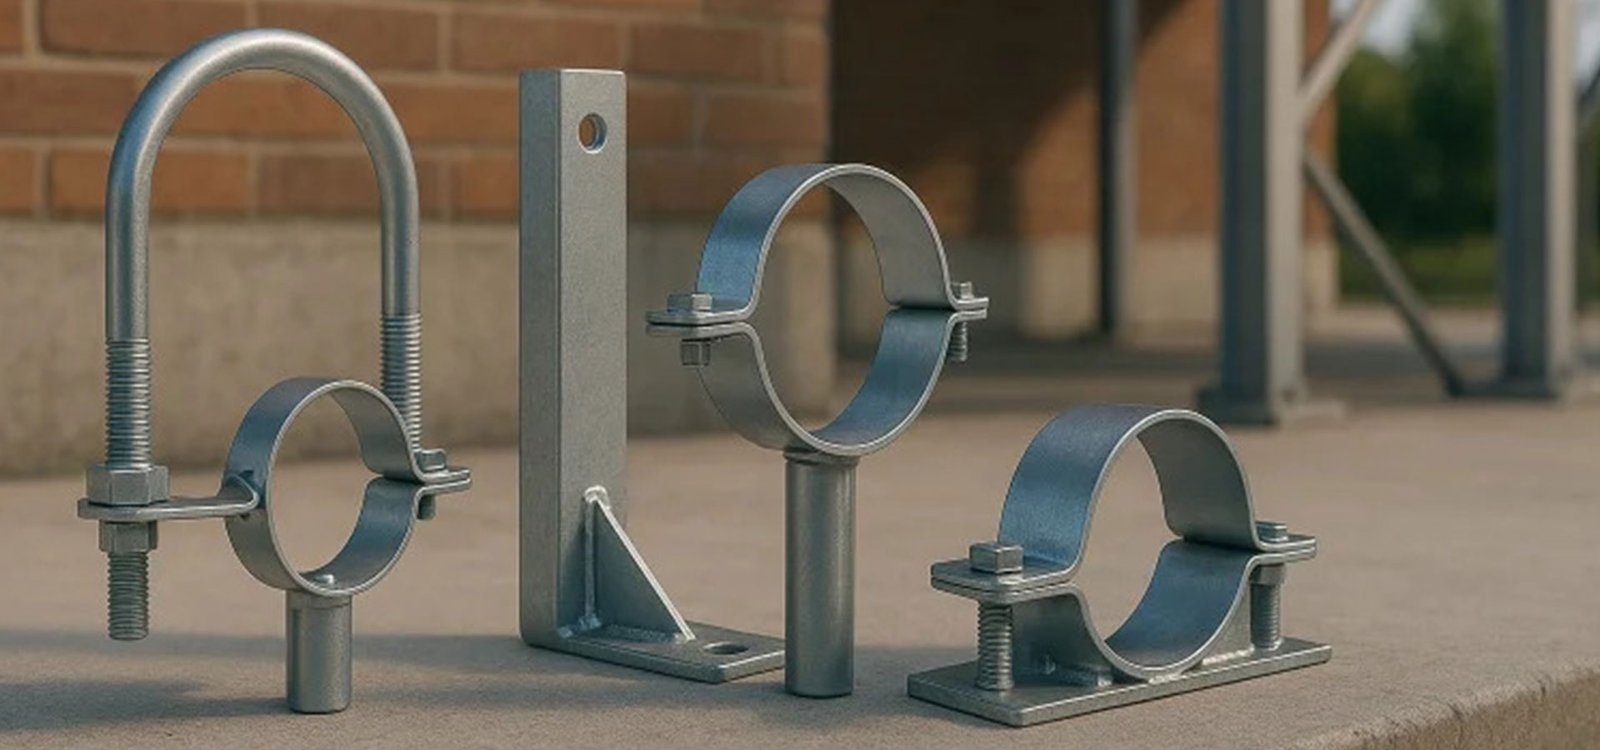
The Bracket Question – Different Materials Need Different Approaches
This catches people out more than you’d think. You can’t just use any old bracket with any pipe material.
Steel Pipes and Steel Brackets Most of my work is steel pipework, so steel brackets or malleable iron ones are usually fine. No weird corrosion issues, everything expands at roughly the same rate. Simple.
Mixed Materials – Where It Gets Interesting Put copper pipes in steel brackets and you can get galvanic corrosion. Basically, different metals create a tiny battery that speeds up rusting. Not good. I use plastic-lined brackets or make sure there’s proper insulation between different metals.
Had a job where someone had put copper heating pipes straight into steel wall brackets. Three years later, the copper was bright green and pitted wherever it touched the steel. Expensive mistake.
Wood and Heritage Stuff Don’t see many wooden brackets these days, but there are still applications. Heritage buildings where conservation officers get twitchy about modern fixings. Agricultural buildings where everything has to look traditional. The key is avoiding moisture traps that’ll rot the timber.
Did a listed building conversion in Chester where we had to use brackets that looked like they belonged in 1750. Took ages to find someone who could make them, cost a fortune, but the conservation officer was happy. Sometimes that’s what matters.
Mounting and Fixings – The Boring Bit That Actually Matters
Backplates and Bolt Sizes Most malleable iron brackets come with either M10 or M12 backplates, depending on the load they’re designed for. M10 backplates are fine for smaller pipes and lighter loads – your typical domestic and light commercial stuff. M12 backplates are what you want for heavier installations or anywhere the loading’s going to be significant.
I’ve seen people try to use M10 fixings for jobs that really needed M12, then wonder why things start working loose after a few months. The extra cost of M12 backplates is minimal, but the holding power difference is substantial.
For outdoor work, I always use galvanised bolts with proper washers. Stainless steel if it’s a really nasty environment, but galvanised usually does the job. Make sure you’ve got adequate thread engagement – at least one and a half times the bolt diameter into solid material.
Wall Mounting Everyone’s first thought – just bolt it to the wall. Works fine when you’ve got solid masonry and the wall doesn’t move much. But buildings expand and contract too, sometimes more than the pipes. Always worth checking with someone who knows about building movement.
With M12 backplates, you want at least 150mm embedment into masonry, more if it’s soft brick or block. Chemical anchors work well for this – much more reliable than expanding bolts in my experience.
Ground Mounting My preference when I can manage it. More work upfront digging foundations, but you get complete independence from the building. Plus easy access for maintenance, which clients always forget about until something needs fixing.
Foundation depth matters – 450mm minimum to get below the frost line. Learned that one in the Peak District when shallow foundations shifted during a particularly grim winter.
Hanging From Above Sometimes there’s no choice. Spring hangers become essential because they deal with thermal movement automatically. Galvanised rod for most jobs, stainless steel if the environment’s particularly unpleasant.
Different Types of Pipe Braces (The Stuff That Stops Things Moving Sideways)
This is something a lot of people forget about until the first windy day. Braces aren’t just supports – they’re specifically about controlling movement and preventing problems.
Sway Braces These stop pipes moving sideways when the wind gets up. Basically adjustable rods connecting the pipe back to something solid. Essential for anything elevated and exposed. I usually use threaded rod with turnbuckles so you can adjust the tension properly.
Guide Braces These are clever – they let the pipe slide lengthwise for thermal expansion but stop it wandering sideways. Use them at direction changes and where pipes go through walls. The sliding bit needs to be robust though – PTFE pads work well, bronze if you want something that’ll last forever.
Tie Rod Braces Rigid connections that stop movement in specific directions. Threaded rod with proper end fixings. Good for transferring loads between multiple support points or when you need absolute rigidity in one direction.
Snubber Braces These are the fancy ones – hydraulic or mechanical shock absorbers that allow slow thermal movement but resist rapid forces like water hammer. Honestly, most jobs don’t need them, but when you do need them, nothing else will do the job.
Wind, Weather, and All That
Wind Loading BS EN 1991-1-4 gives you the calculations, but honestly, the real world can be a lot nastier than the sums suggest. Local conditions make a huge difference – wind getting funneled between buildings, that sort of thing.
If it’s out in the open and up in the air, it needs proper bracing. I use adjustable rod braces back to solid structure. Better to overdo it slightly than get a call about vibrating pipes.
Had one job near Manchester airport where the wind patterns were completely mental because of the runway layout. Pipes that should have been fine according to the calculations were shaking like mad. Ended up doubling the bracing.
Drainage This is one of those boring details that actually matters quite a lot. Water sits around supports, you get accelerated corrosion. Water sits around and freezes, you get mechanical damage.
Slope everything so water runs off. Put drain points at low spots. Not exciting, but it works.
What I’d Do Different If I Started Again
Looking back over twenty years of this, I reckon I spent too long trying to save money on supports. The difference between cheap brackets and decent malleable iron ones is usually a few quid per support. The difference in call-outs and hassle is massive.
I’d also have learned to read thermal expansion calculations properly from the start instead of just winging it. Made some expensive guesses over the years that could have been avoided.
Standards Are Just the Starting Point
Building regs and British standards give you the minimum you need to do. But they can’t cover every daft situation you’ll come across. Local knowledge matters. Understanding how your materials actually behave over time matters more.
Weather’s Getting Worse Don’t know if it’s climate change or just bad luck, but we seem to be getting more extreme weather. Bigger temperature swings, higher winds, more severe frost. Whatever’s going in now needs to handle worse conditions than what we used to see.
Another reason to lean towards robust solutions rather than trying to cut every corner.
Final Thoughts
After all this time, it comes down to something pretty simple: outdoor pipe supports are an investment. When they fail, it’s expensive – emergency repairs, potential safety issues, insurance claims, unhappy clients.
Get the materials right for your specific job. Don’t ignore thermal movement and wind loading. Always design so someone can actually get to the supports for maintenance.
And remember the one-metre rule – support within a metre of anything that changes direction, has a valve, or connects to equipment. That one rule will save you more grief than any amount of fancy calculations.
Oh, and one last thing – if you’re not sure about something, ask someone who does know. Pride’s expensive in this game.
Right, that’s probably enough rambling for one article. Hope some of it’s useful. Any questions, drop me a line – always happy to chat about this stuff.
Paul